4/26/2013

BlazeDVD Pro Coupon Code Save 30%


Hot Summer, Hot Sales! Do not miss out the 30% off on our hot region free DVD player BlazeDVD before April 30 this year. Remember the coupon code BLZ-SUMMER.

BlazeDVD Pro is the ultimate region-free DVD, Video CD, Audio-CD and media file player, specially designed for users who are looking for superior video and audio playback quality, in addition it fully supports DIVX, MPEG4, RM, QuickTime, WMV, WMV-HD, Flash and more.
BlazeDVD Pro Major Features:
All-in-one media player supports the most popular video formats, including high-definition, DVD, VCD, SVCD, photo slideshow playback.
Best DVD region free player supports to play and record automatic unlocking of locked DVD, and any region-coded/CSS-encrypted DVDs.
DVD recorder and video converter supports to record DVD movies and convert the recording DVD files into ASF, AVI, iPod MP4, MPEG, PSP MP4 formats for playback on most popular portable devices such as iPad, PSP, iPhone or other media players on the go.
Offer you outstanding video and audio quality when watching DVD movies by the selectable audio tracks like AC-3, Hi-Fi Audio, Dolby Pro Logic II, Dolby 5.1/ 7.1 channels and a built-in full featured audio equalizer.
More advanced features contain Parent Control by restricting specific movie levels or setting password protection, Picture in Picture, Snapshot capturing, multiple screen display modes, Auto Resume Play, bookmark function, and more.


BlazeDVD Pro Promotion

Retail Price: 49.95 USD
Now Discount Price: 34.96 USD
You Save: 14.98 USD
Coupon Code: BLZ-SUMMER


Purchase BlazeDVD Pro and Save 30%
Buy BlazeDVD Pro  30% discount by entering the coupon code BLZ-SUMMER
You can also purchase more BlazeVideo products with 30% discount on http://www.blazevideo.com

7/21/2012

How to Decrypt and Backup a Commercial DVD?


Ripping DVD is a good way to keep a backup and stream video over Internet, or transfer video to portable devices. However, most commercial DVDs are always protected by CSS (content scrambling system), a defense against movie piracy. CSS encrypts data with a special key. The key is not a secret to DVD playing software developers who need it to read the information.
If you want to decrypt and backup DVD, technically, you need seek help from some DVD decrypting software available that can help to decrypt a protected DVD. There are several programs that can successfully decode the CSS encryption. One is CloneDVD that not only removes the protection, but also gives the user the luxury of ripping specific portions off the movie. Plus, it can copy them to a recordable DVD. And next we will show you how to decrypt a DVD and backup it.

GUIDE ON HOW TO DECRYPT A DVD

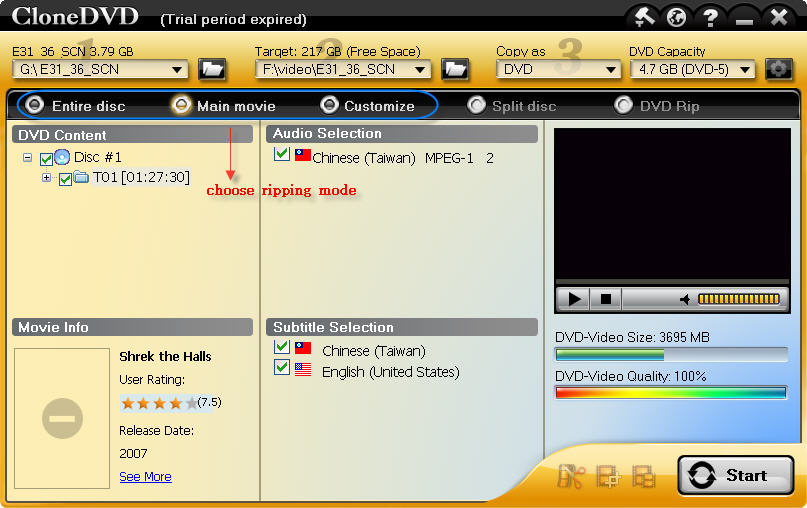
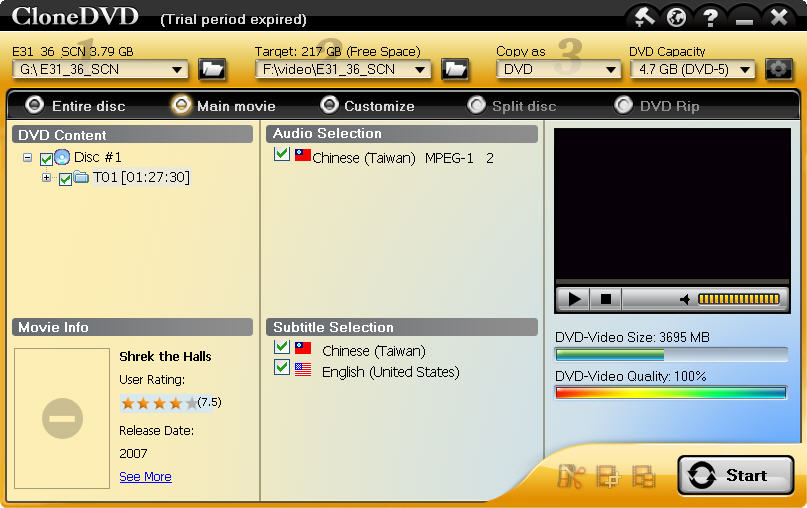
Step 1. Run the software and load your DVD. When you launch the program, the tray automatically eject, just put the disc onto the tray. It will show the DVD information on its interface.
load the commercial dvd
Step 2. Choose a ripping mode.
choose a ripping mode
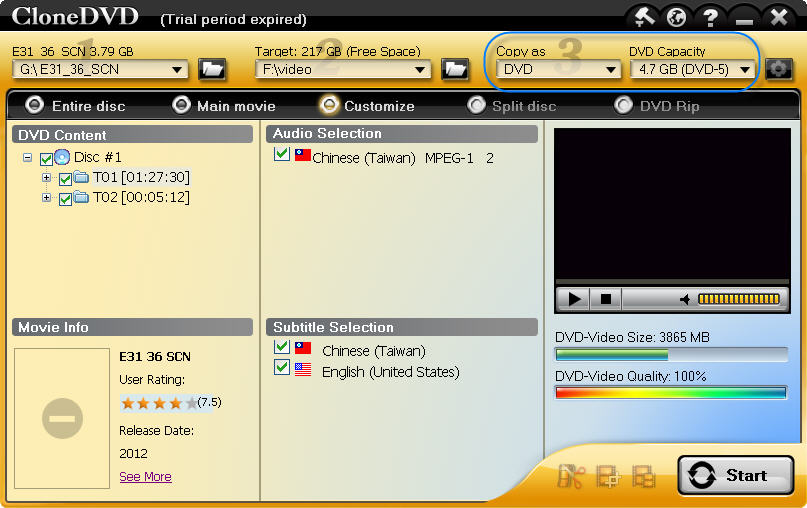
Step 3. Select output format. You can choose Copy as DVD, DVD ISO, or Movie File.
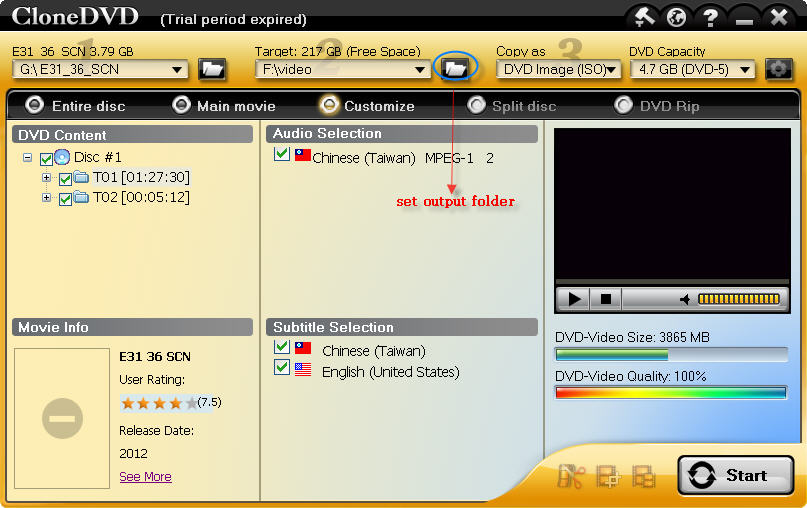
set output foler to save file
Step 4. Choose output folder. Specify an output folder to save the file. Click “Browse” button to choose the path where you want to save the output files in.
choose output format
Step 5. Start to decrypt.  After finish the above steps, click “Start” button to start ripping, you could view the conversion progress and are able to cancel the converting process at anytime.
This DVD decrypter automatically removes all the protections (CSS, RCE, APS, UOP, etc) in the background. There is free trial version available, you can download the DVD decrypter and have a try.

7/18/2012

Convert DVD Movies to an iPod on Windows


Many people would ask these questions:
* How do I put DVD movies on my iPod?
* What video format does an iPod support?
* How to rip DVDs to my iPod?
An iPod supports MP4 video with 320*240 resolution. You can’t directly put DVD movies on an iPod because an iPod neither has a DVD drive on nor supports MPEG-2 format. This article will show you how to put DVD on iPod using Aviosoft DVD to iPod Converter, a professional tool for iPod video.
The Goal
Take whatever DVD source you want to use and rip it to MP4 (320*240) video that is supported by an iPod.
how to put dvd to ipod
1. Load DVD movie
Download DVD to iPod Converter, install and run it on Windows. Insert the disc into the DVD drive. The converter will auto load the disc, and display all the information including video size, video quality, audio, subtitle, titles, etc.
2. Convert DVD to iPod
2.1. Set output format.
Click setting to choose a resolution. Here, we choose “High Quality (320×240)”. You can also customize the video.
2.2. Choose a conversion mode.
There are 4 conversion modes available, select your desired one.
2.3. Start conversion.
Start DVD to iPod conversion by clicking the “Start” button on the right bottom corner.
Tips: If you just want to rip a chapter, just choose the “Customize” mode and uncheck other titles.
3. Put DVD on iPod
After the conversion finishes, you will get a file that is ready to be played on iPod. But do you know how to put DVD on iPod? Here is the way:
3.1. Click open after the conversion finishes.
3.2. Find the file in the destination folder and transfer it to iTunes.

7/13/2012

How to restore computer to earlier time


Delete an important file by mistake? Computer is not functioning correctly? System files have been corrupted by some virus? Do not worry. All can be solved easily by the System Restore tool in Windows without any cost! Follow the simple steps here to return your computer to a previous state using System Restore tool.

ALL THE THINGS YOU NEED

A computer with Windows XP operating system

INSTRUCTIONS ON HOW TO RESTORE COMPUTER TO EARLIER TIME

Step 1 To perform the System Restore tool, you need to log on to Windows as Administrator first.
Step 2 Select the start button.
Step 3 Select All Programs.
Step 4 Select Accessories.
Step 5 Select System Tools
Step 6 Select System Restore (see the picture below).
how to restore computer to earlier time

Step 7 On the “Welcome to System Restore” page, select “Restore my computer to an earlier time”.
Step 8 Click “Next” button.
Step 9 Drop down to select the date you want to restore to. And then click “Next” button.
Step 10 The System Restore tool will restore your computer to the date you selected and restart your computer.

7/10/2012

How to Play DVD Using DVD X Player?


It is very simple to watch a film using DVD X Player. Commonly, you just need to insert the disc; DVD X Player will automatically detect the disc and begin to play it. It provides a control panel for you to play the disc at your will: play, pause, stop, repeat, control for volume, mute, speed, chapter and menu navigation. Following is the tutorial on how to play DVD with the region free DVD player.

PLAY DVD GUIDE

Step 1. Download and Startup DVD X Player

Download DVD X Player; install it by following the prompts. Startup DVD X Player, open the main interface.
main interface - DVD X Player

Step 2. Get start to Play DVD

Insert a DVD into the default DVD drive. There will be a window popped up, choose “Play using DVD X Player”, choose “Always do the selected action” and click “OK”. Then, it begins to play the DVD movie now. As long as auto play is set, DVD X Player will auto start to play next time.
select player

Step 3. Control playing DVD

Auto Resume Play: During the DVD movie playback, if you want to stop playing, just click Stop stop button button. If you want to play it again, just click Play play button button. The Auto Resume Play window will pop up.
auto resume play
Pause a Movie: Click Pause pause button button on the main panel or press Space key. To resume the playback click Pause, Play or press Space key again.
Full Screen Playback: Click full screen button icon, or double click the playing window, it will switch to full screen mode.
Volume Control: Move the volume control bar upward to increase the volume and move it downward to decrease the volume. If you want to turn off the sound, just click “Mute On” button and click it again to turn on the sound.
Color Adjustment: Go to advanced panel by clicking advanced panel button. Click “Show Color Control”, move the bar to adjust brightness, contrast, saturation, hue.
Fast Forward & Fast Backward: Use F. F button and F. B button on the control panel.
Change chapter: Click “Next” button to skip to the next chapter, click “Previous” button to go back to the previous chapter.

Step 3. Eject the Disc and Close DVD X Player

Click “Stop” and then eject button icon. Click Power off closebutton to close the DVD player.

7/04/2012

How to Fix the DVD Burner Problems?


Though adding a DVD burner is not expensive or difficult, DVD burners are usually pre-installed in a notebook or computer. A DVD burner is an internal optical device used to encode or burn information to a blank DVD. You DVD drive run abnormally due to the physical problem with the DVD burner, then you need to fix the DVD burner.
dvd-burning

FIX DVD BURNER

  • 1. Power off the computer and remove all the connection cables from the PC case. Get a screw driver to remove screws from the case and remove the side panel to open the tower.
  • 2. Remove the interface and power cable of the burner. Check the connectors to see if there is physical damage. Clean the dust by a canned air. Reinstall the cables, case, etc.
  • 3. Use a lens cleaning disk to clean the lens.
  • 4. Try to play several different types of DVDs, like movie DVD, data DVD, to see whether the drive can play them normally.
  • 5. Try to burn a DVD using the DVD burning software to see if it has been fixed, and use different burning software to see if there is an issue with the compatibility. If it still has problem to burn a disc, the laser calibration may be set incorrectly or the laser lens may be damaged. Then you need to replace it.
Note: The drive’s physical connections may have been loose or there may be dirt on the lens. Try to tighten those connections or clean the lens before contact the manufacturer.

6/27/2012

Free Tip to Convert DVD Movie to iPhone 4S – Customize


Have an iPhone 4S on hand? Watching DVD movies is a routine for you to do with your iPhone 4S? A good DVD to iPhone converter will make things easier, ease you from the tiresome job to rip to iPhone MP4 format, and accomplish the job with great quality and super fast converting speed!
Customized mode allows users to rip only a chapter or several chapters that they like. They can get exactly what they want. This is good for people who want to repeatedly watch some nice moments and will vacate mobile space for storing some more videos.
Aviosoft DVD to iPhone Converter is tool that can convert any DVD to iPhone MP4 format with optional multi-channel, just your best choice. It is very easy to use for newbie. Now, let’s get down to the detailed operation steps to customize DVD to iPhone 4S.

Guide on How to Convert DVD to iPhone 4S

Before converting DVD, you need to download and install the DVD converter on Windows computer first.

Step 1. Load the DVD

Startup the converter, load the disc by inserting it into DVD drive. The converter will read it quickly and show all the information on its interface. DVD size, quality, release date, ratings, titles, audio, subtitles, etc.

Step 2. Custom Output

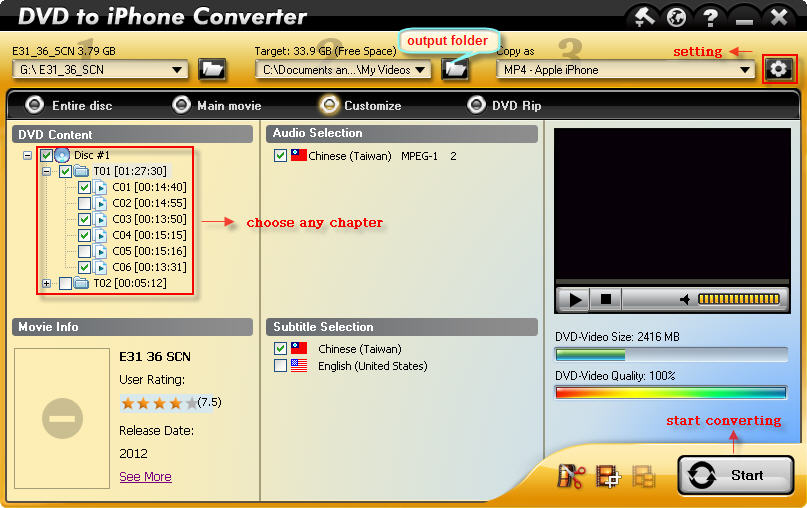
  • 1). Choose Customize mode. Select the titles you want to convert from DVD Content.
  • 2). Choose audio and subtitle. Specify an output folder to save converted file.
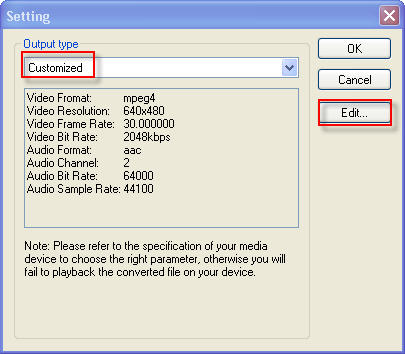
  • 3). To adjust output settings, you can set the detailed parameters of output format in the Setting window. There are four default options and you can choose customized type and edit the parameter then click “OK”.
setting

Step 3.  Start Ripping Process

After finishing the above settings, check the needed file, click “Start” button on the bottom right corner, to start converting the DVD movie. You can view the progress of the converting process from the progress bar.
Tip: You can click the Abort button to cancel the process as needed.
custimize dvd to iphone
After the conversion finishes, transfer the converted movie to iTunes and enjoy the customized DVD movie at anytime anywhere.